Monday, July 4, 2011

Felting by hand

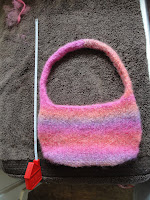
I've done a lot of felted projects - I think nearly all purses - and I don't like the mess where the washer empties into the old timey basement drain. I decided to try my hand at felting... by hand.

I have made this purse many times. I use the "pink lady" knitting pattern (http://www.junebugsplace.com/hkpurses.htm) as a guide but I pretty much do my own thing, because I like the purse to end up pretty small. I CO 10 instead of 20 and go from there. I like to give this as a baby shower gift with a set of baby toy keys. It's a quick project - I whipped this up last night (three hours-ish).

Starting size = 13.5 inches
Ending = 10.5 inches

The particulars:
- I used Wisdom Yarns "Sonnet" for this project (75% wool, 25% silk). Each skein is 93 yards which was just enough.
- Kitchen sink of hot water, just enough to cover your work is all you need
- Gloves
- Just a bit of dish soap
- Agitate by hand
- I drained some of the water out of the sink when it cooled off and added more hot (from the stove -- I wanted the purse to know I meant business).
- After about 10 minutes, I took the piece out of the hot water and shocked it a bit with cold water. I can't be certain this was actually useful. I had read on a few blogs that it was helpful, but I was mostly getting impatient.
- After about 20 minutes, I could see some real progress. Left it in for 30 minutes total.

Happy felting!

Pink lady pattern - scroll way down on this page: http://www.junebugsplace.com/hkpurses.htm
(not to be confused with the mega or phat pink lady versions of this pattern)

Thursday, May 19, 2011

This Old House

brick chimney in need of a little TLC
after
We are remodeling our old timey kitchen.

We pulled the plaster off our brick chimney and were pleasantly surprised at the condition of the brick.

A wire brush scrubbed down the brick pretty well, and then it was time to seal it.

An internet search revealed all sorts of routes. For the future weary soul trying to decide how to proceed, here is what we did:

After the wire brush routine, I went over the chimney with a little dust broom and lots of additional debris and dust flew off.

To seal the brick, I used an acrylic sealer, thick paint roller and 2-inch brush. Newspapers served as a drop cloth -- lots of runoff and more debris.

The result has a bit of a shine but not too much, thankfully. The crumbly mortar is sealed really well. I am pleased with the results.

Product:  Seal Best Concrete Sealer (http://www.homedriveway.com/images/pages/concreteproducts.htm). It had no toxic fumes and was easy water clean up. I could not find this at Lowe's but Menards had it.

Saturday, May 14, 2011

Kitchen Remodel


We are remodeling our kitchen. In its day, it was a top-of-the-line St. Charles kitchen, but it's now about 50 years old and in real need of updating.

A brick chimney that vents the furnace runs through the corner of our 80 year old bungalow kitchen. When we gutted the kitchen, we pulled the plaster off the chimney and found the brick to be in surprisingly good condition.

We prefer to keep the brick exposed rather than cover it with drywall, although it'll be partially covered with cabinets. I wasn't sure how to prep and seal the brick, and turned to Google. The information out there is all over the map, so here is how we handled the prep work:
  • A small chisel and hammer were used to remove the bulk of the remaining plaster from the brick.
  • Dust and more dust. Protective eye wear and a mask helped a bunch.
  • A wire brush scrubbed off the remaining bits of plaster. More patience than elbow grease was needed.
  • A spray bottle of water helped keep the dust down.
I read a lot about muratic acid but we didn't need anything harsher than a wire brush, thank goodness.

Next up: sealing the brick.

Monday, January 17, 2011

Labrador Retriever: Paw Pad Troubles

my Chocolate Lab's paw
The dog cut his paw and now of course won't leave it alone. The dial-a-vet said to have him wear a sock, which seems like a ridiculous idea.

Neosporin's been a bust too. He just licks it off. Once you finally get it on his paw, that is. He's frightened of all medications, including heart worm tablets disguised as "treats," so it took some doing to get him to cooperate.

I do believe antibiotics are in his future. I don't see how the dang thing is going to heal without some help.

Update:
I did cover his paw with a sock as the dial-a-vet recommended, and the dog seemed agreeable. As soon as I left the room, however, he promptly took off the sock and ate it. It took 4 days for him to throw it back up. I don't recommend the sock route.

We did end up needing a trip to the vet and antibiotics to get this cleared up.

MicroPantry Meal Kit Idea: Vegetable Soup

MicroPantry Meal Kit Idea: Vegetable Soup If your micro pantry has cans and cans of beans, this is a good meal kit to put together to he...